ऑडियो प्लेयर
Player main application screen है जहां आप player queue और playback features जैसे equalizer, sleep timer, audio bookmarks, और अधिक control कर सकते हैं। आइए इन functions को navigate और utilize करने के बारे में closer look लें।
Player Access करना
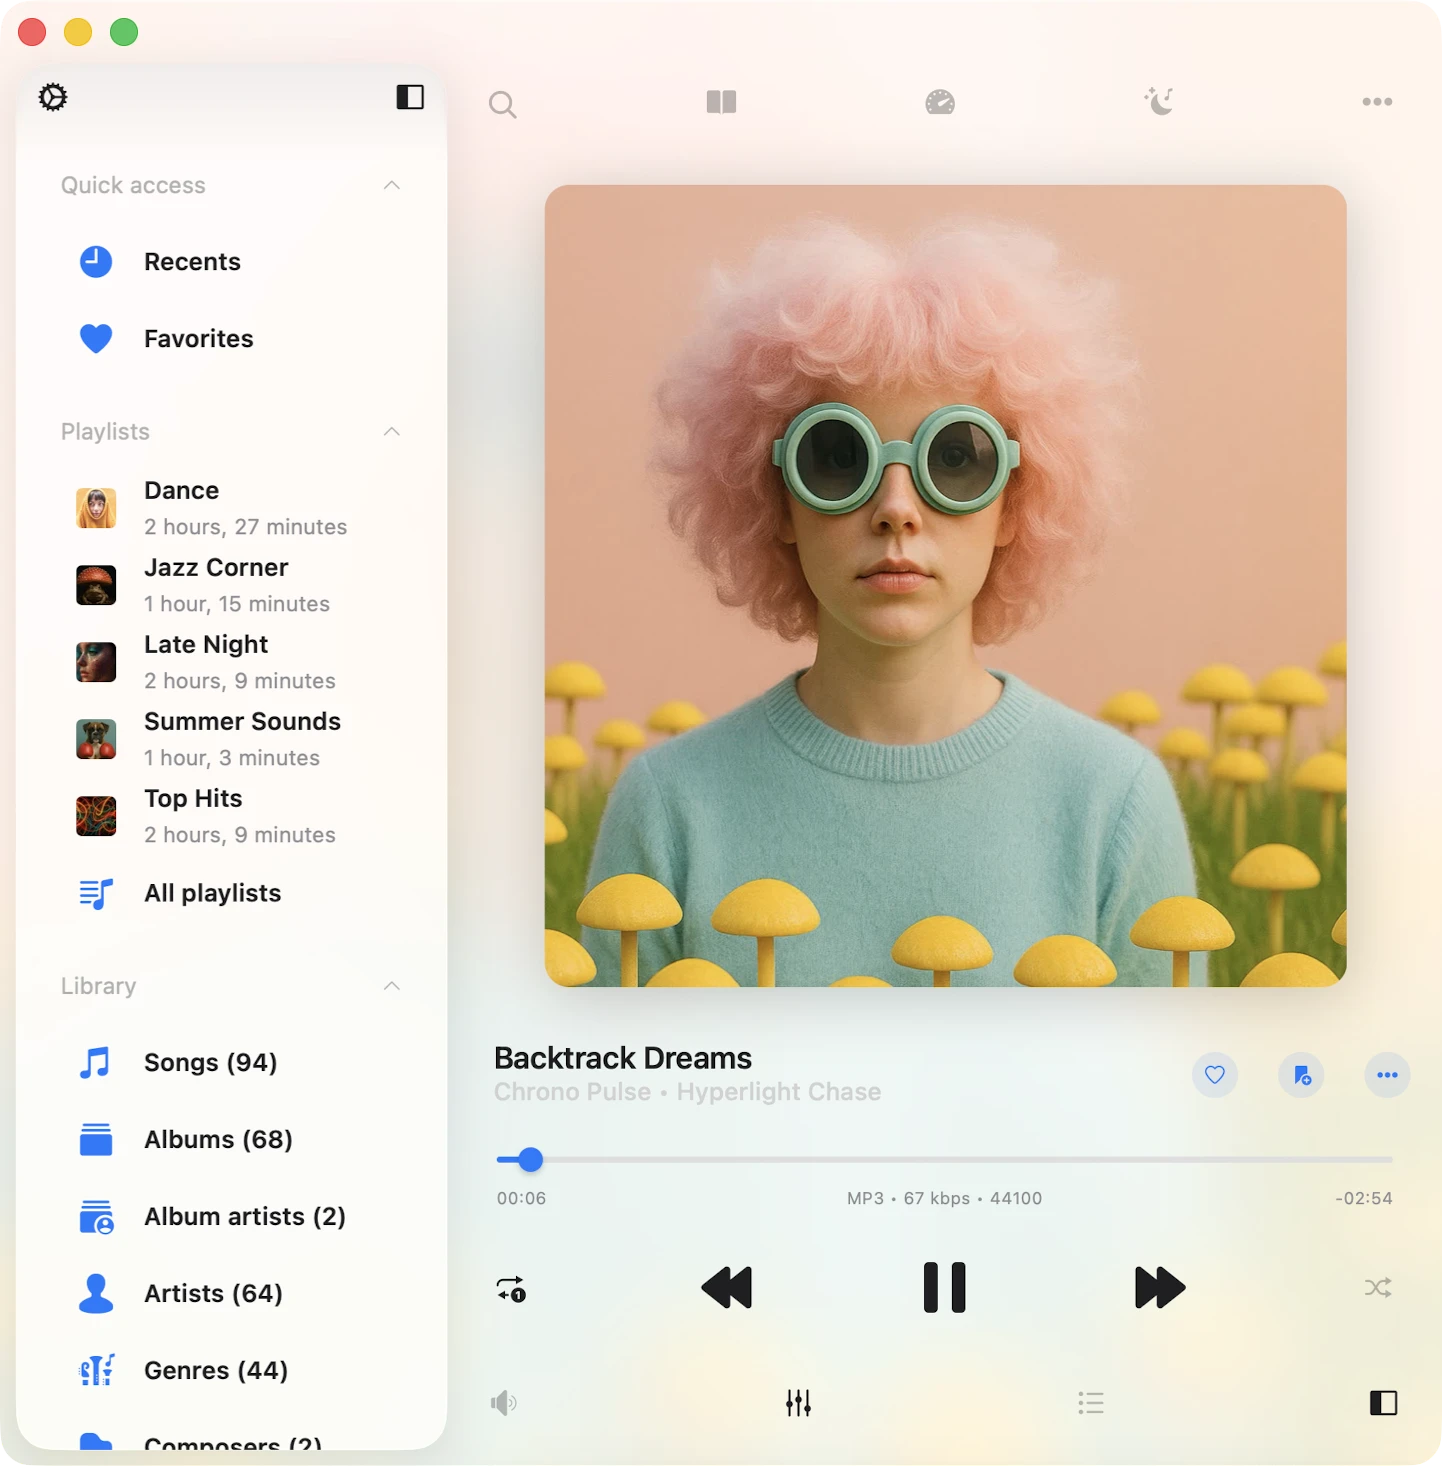
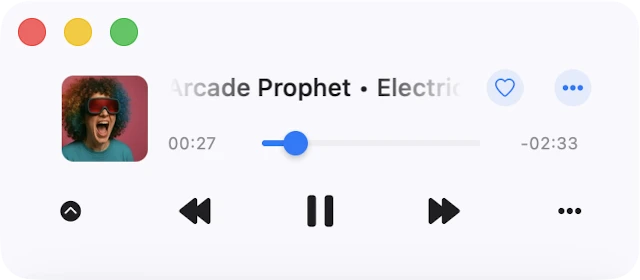
आप mini-player view से full-screen player access कर सकते हैं। अपने iPhone पर, आप main screen पर tab bar के ऊपर mini player find करेंगे। अपने iPad या Mac पर, यह left menu से accessible है। Mini player को tuck away करने के लिए, उसके icon पर टैप करें और downwards swipe करें। Full-screen player को completely hide करने के लिए, simply bottom right corner पर located close button टैप करें।
Supported Audio Formats
सबसे popular audio formats supported हैं: mpeg, aifc, 3gp, avi, aif, latm, 3gpp, m4a, loas, cdda, aac, m4p, m4b, ac3, pls, mp4v, m3u, m4r, aiff, xhe, mp1, snd, mp2, wav, qt, wave, m3u8, m4v, mp3, 3g2, caf, mp4, flac, au, w64, ec3, adts, amr, vtt, mpa, aa.
Playback Controls
Player screen के bottom पर, आपको playback controls मिलेंगे। इनमें “Play,” “Pause,” “Next Track,” और “Previous Track” जैसे buttons शामिल हैं। Default रूप से कुछ hidden controls भी हैं जैसे “Next 30 sec” और “Previous 30 sec,” जो app settings में enable किए जा सकते हैं। Fast forward या rewind करने के लिए, Next/Previous Track buttons के साथ tap-and-hold gesture का उपयोग करें। जब track के specific part पर jump करना हो, तो playback slider का उपयोग करें।
Repeat और Shuffle
जब आप repeat mode change करना चाहते हैं, तो repeat button पर simple tap काम करेगा। आपके पास कई options हैं:
- “Repeat All” – आपके player queue के सभी tracks loop करने के लिए।
- “Repeat One” – केवल current track repeat करने के लिए।
- “Repeat Stop” – current track ends होने पर playback pause करने के लिए।
- “Repeat None” – बिना repeat किए अपने queue को play through करने देने के लिए।
अगर आप कुछ randomness के mood में हैं, तो “Shuffle” option आपका go-to है। यह queue में आपके tracks का order shuffle करता है, हर बार एक fresh listening experience देता है। आप easily “Shuffle off” और “Shuffle on” के बीच switch कर सकते हैं।
Volume Control
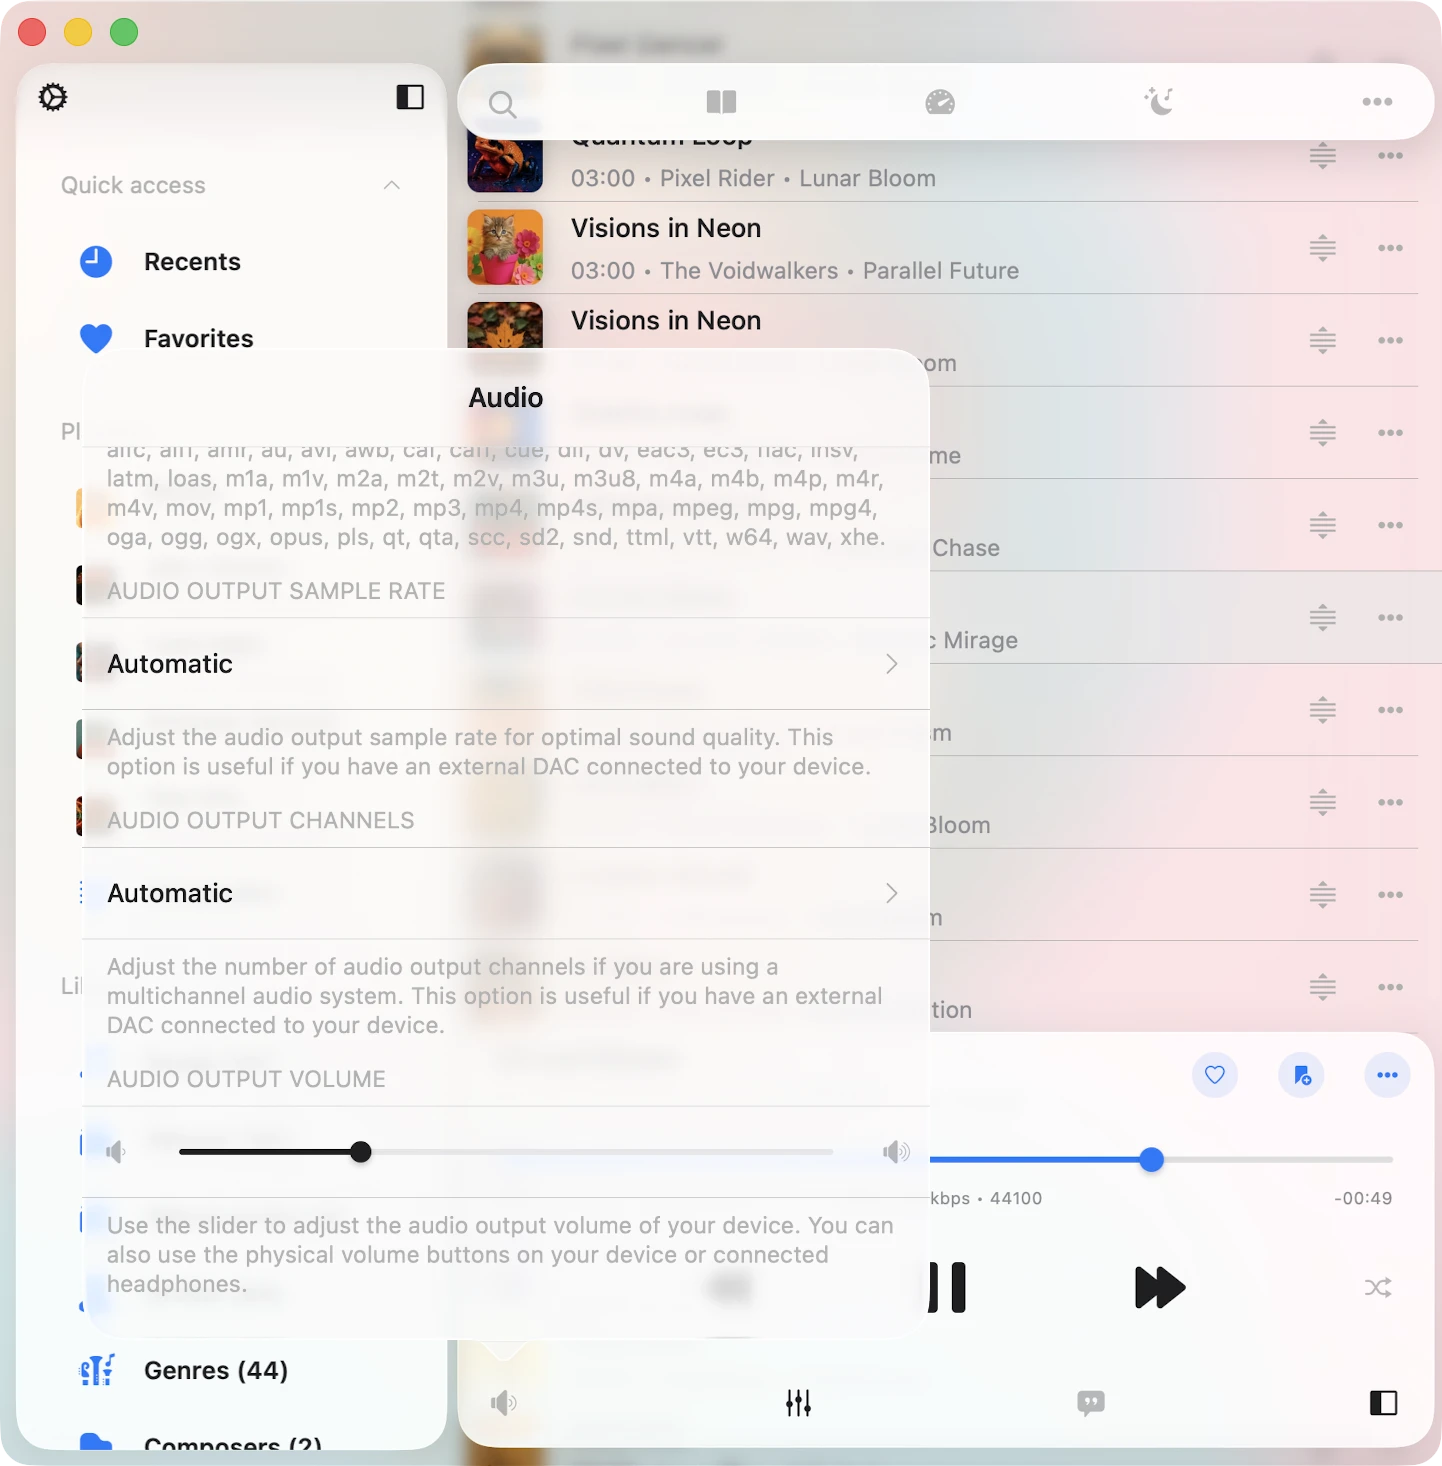
Playback controls के नीचे sound icon टैप करके Audio Settings screen पर volume slider find करें। आप इस slider या अपने device पर standard volume buttons का उपयोग करके volume change कर सकते हैं। इसके अलावा, आपको कुछ handy streaming buttons मिलेंगे:
- “Google Cast” आपको Google Chromecast devices से connect करने देता है।
- “AirPlay” आपको AirPlay technology का उपयोग करने वाले devices के साथ link up करने देता है।
Google Cast
Google Cast use करने वालों के लिए, आपको audio player screen के bottom या Audio Settings screen पर Google Cast icon दिखेगा। Available devices की list reveal करने के लिए simply उस पर टैप करें। वह select करें जिससे आप connect करना चाहते हैं और अपना audio content streaming शुरू करें। बस ensure करें कि आपका Google Cast device और आपका iPhone/iPad same Wi-Fi network पर हों। ध्यान रखें कि app में available सभी audio formats Google Cast devices द्वारा supported नहीं हैं, इसलिए कुछ tracks streamable नहीं हो सकते।
AirPlay
दूसरी ओर, अगर आप AirPlay prefer करते हैं, तो audio player screen के bottom या Audio Settings screen पर AirPlay button देखें, जिसे आप screen के bottom पर volume button टैप करके access कर सकते हैं। उस पर quick tap से आप available device choose कर सकते हैं जिस पर आप audio content stream करना चाहते हैं। Application AirPlay2 technology भी support करती है, जो आपको एक साथ multiple AirPlay devices पर audio content share करने enable करती है।
Audio Equalizer
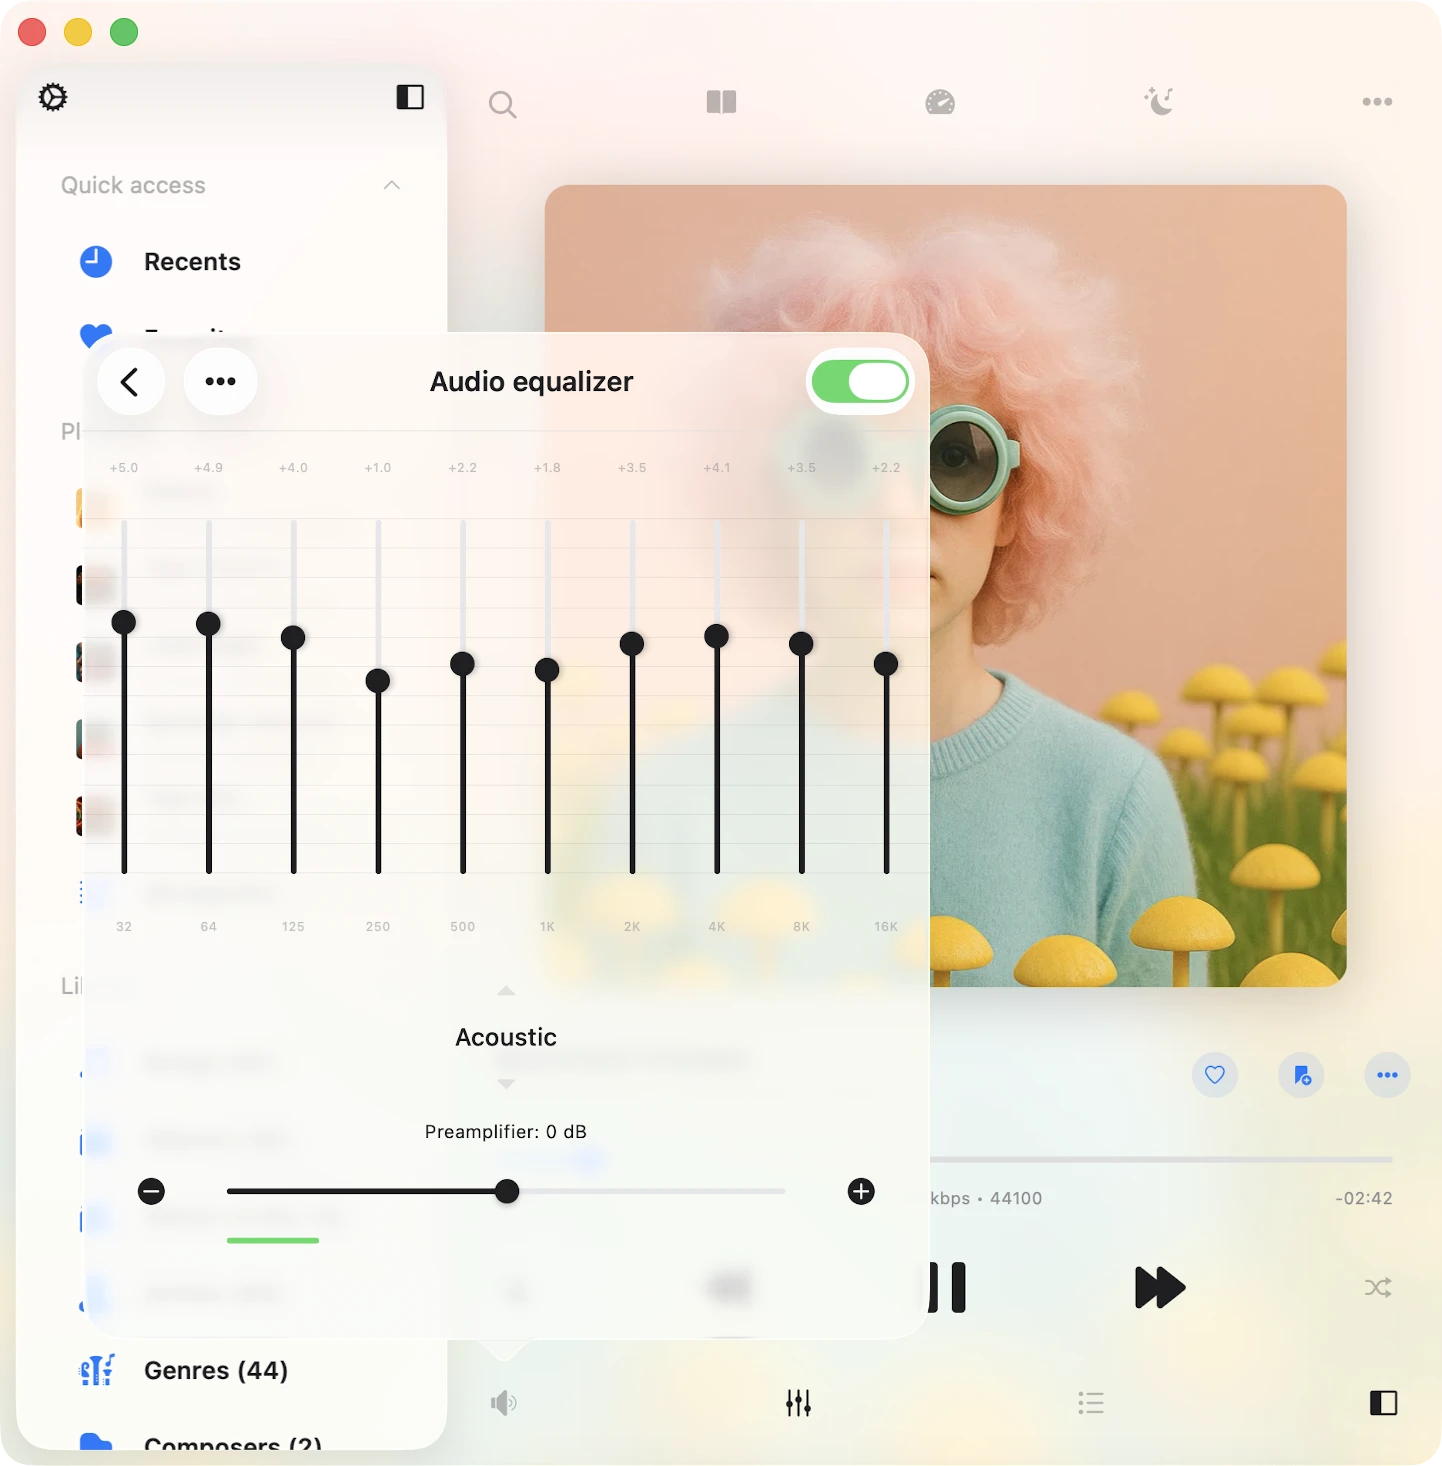
Evermusic iPod-style presets, preamplifier, और manual equalizer settings के साथ एक 10-band equalizer के साथ packed है। Equalizer activate करने के लिए, simply bottom toolbar पर “Equalizer” button टैप करें और top right corner में switch control toggle करें। आप “Acoustic”, “Bass Booster”, “Classical,” और अधिक जैसे predefined equalizer presets की range से select कर सकते हैं। अगर आप sound enthusiast हैं, तो आप sliders का उपयोग करके हर frequency band fine-tune करने की ability appreciate करेंगे। अपने खुद के audio equalizer presets create और save करने के लिए free रहें। अगर कोई track loud enough नहीं है, तो आप preamplifier gain भी adjust कर सकते हैं। हमारे पास equalizer use करने के बारे में अधिक detailed instructions यहां हैं।
Player Mode Toolbar
Select few player screen styles के लिए आपको player screen के top पर, navigation bar के right below एक player mode toolbar मिलेगा। यह handy toolbar तीन buttons house करता है।
- “खोजें” – आपके player queue में specific track quickly locate करने के लिए Ideal।
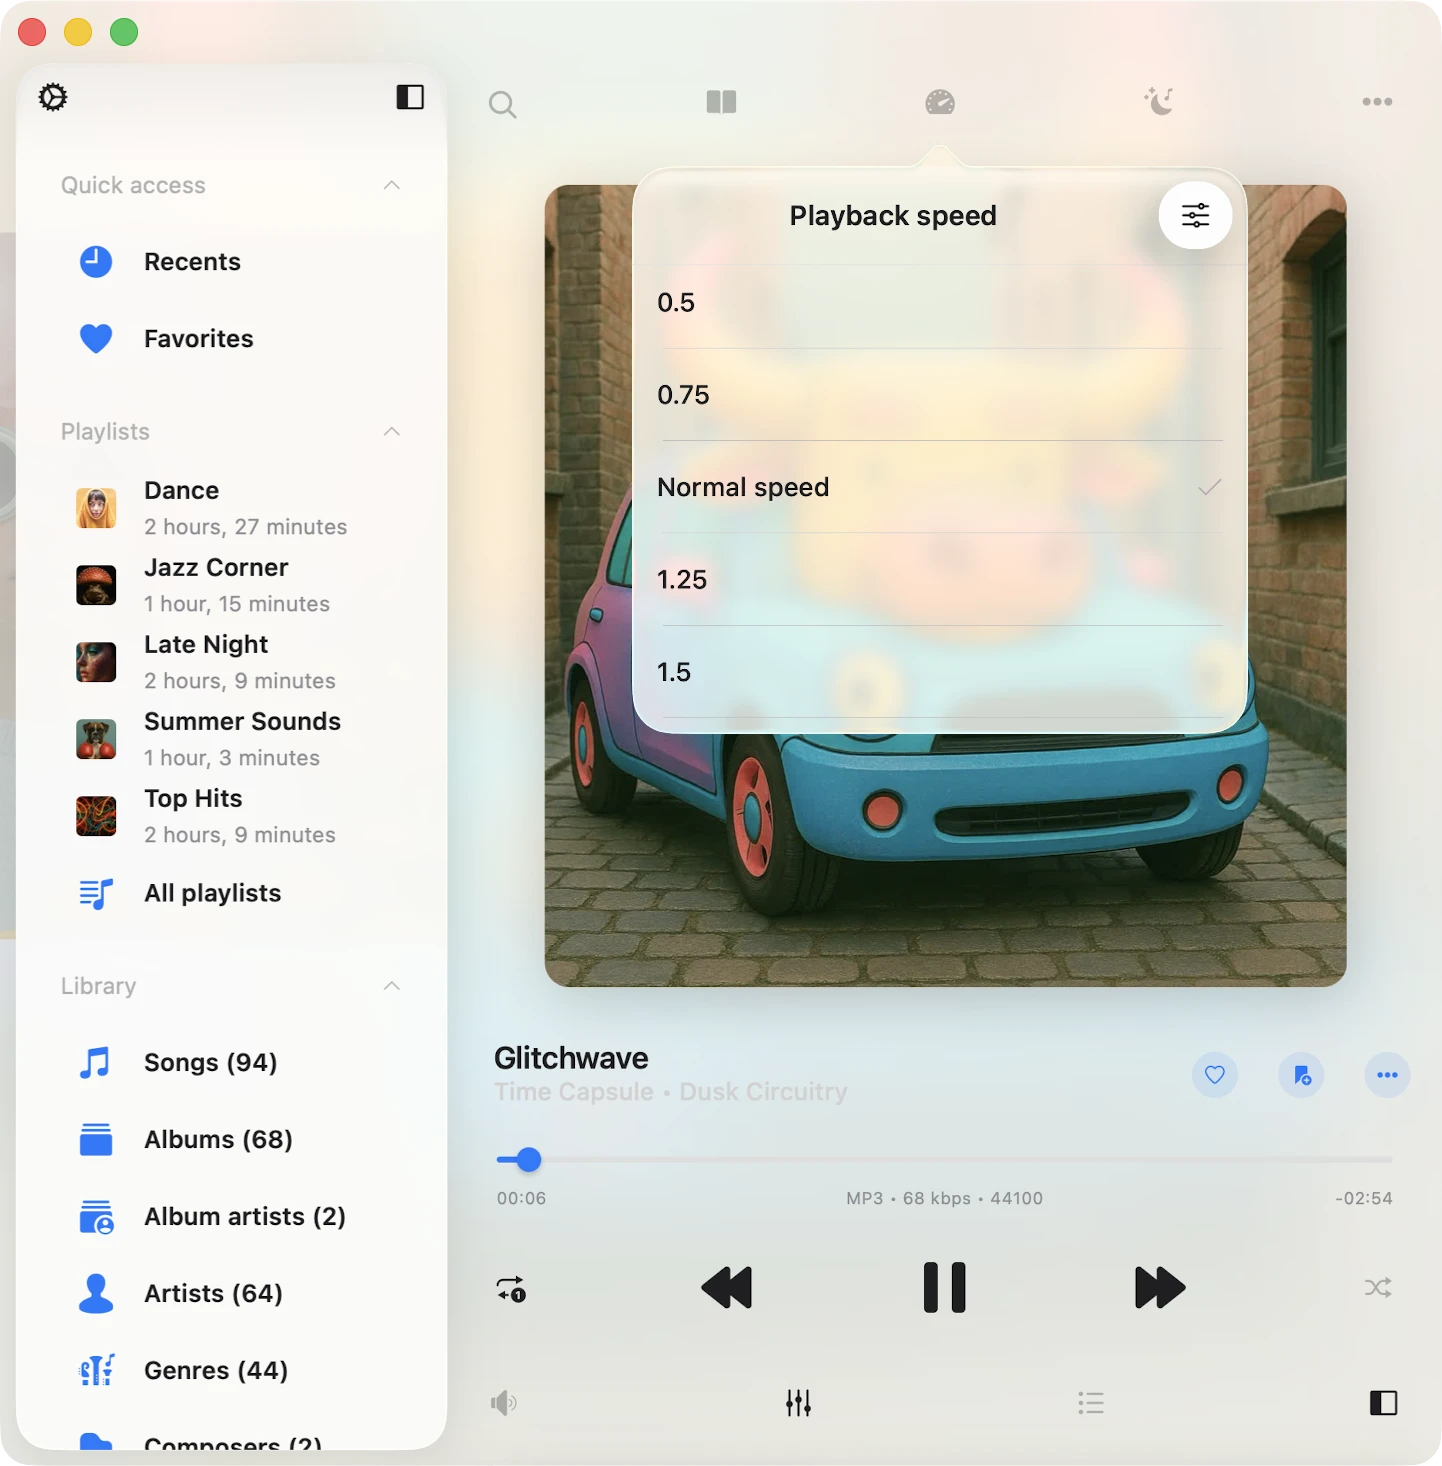
- “Playback speed control” – 0.02x से 3.00x तक अपनी playback speed Adjust करें। Audiobooks और lectures enjoy करने वालों के लिए Perfect। Default speed settings पर revert करने के लिए, simply “Normal” speed टैप करें।
Audio Bookmarks
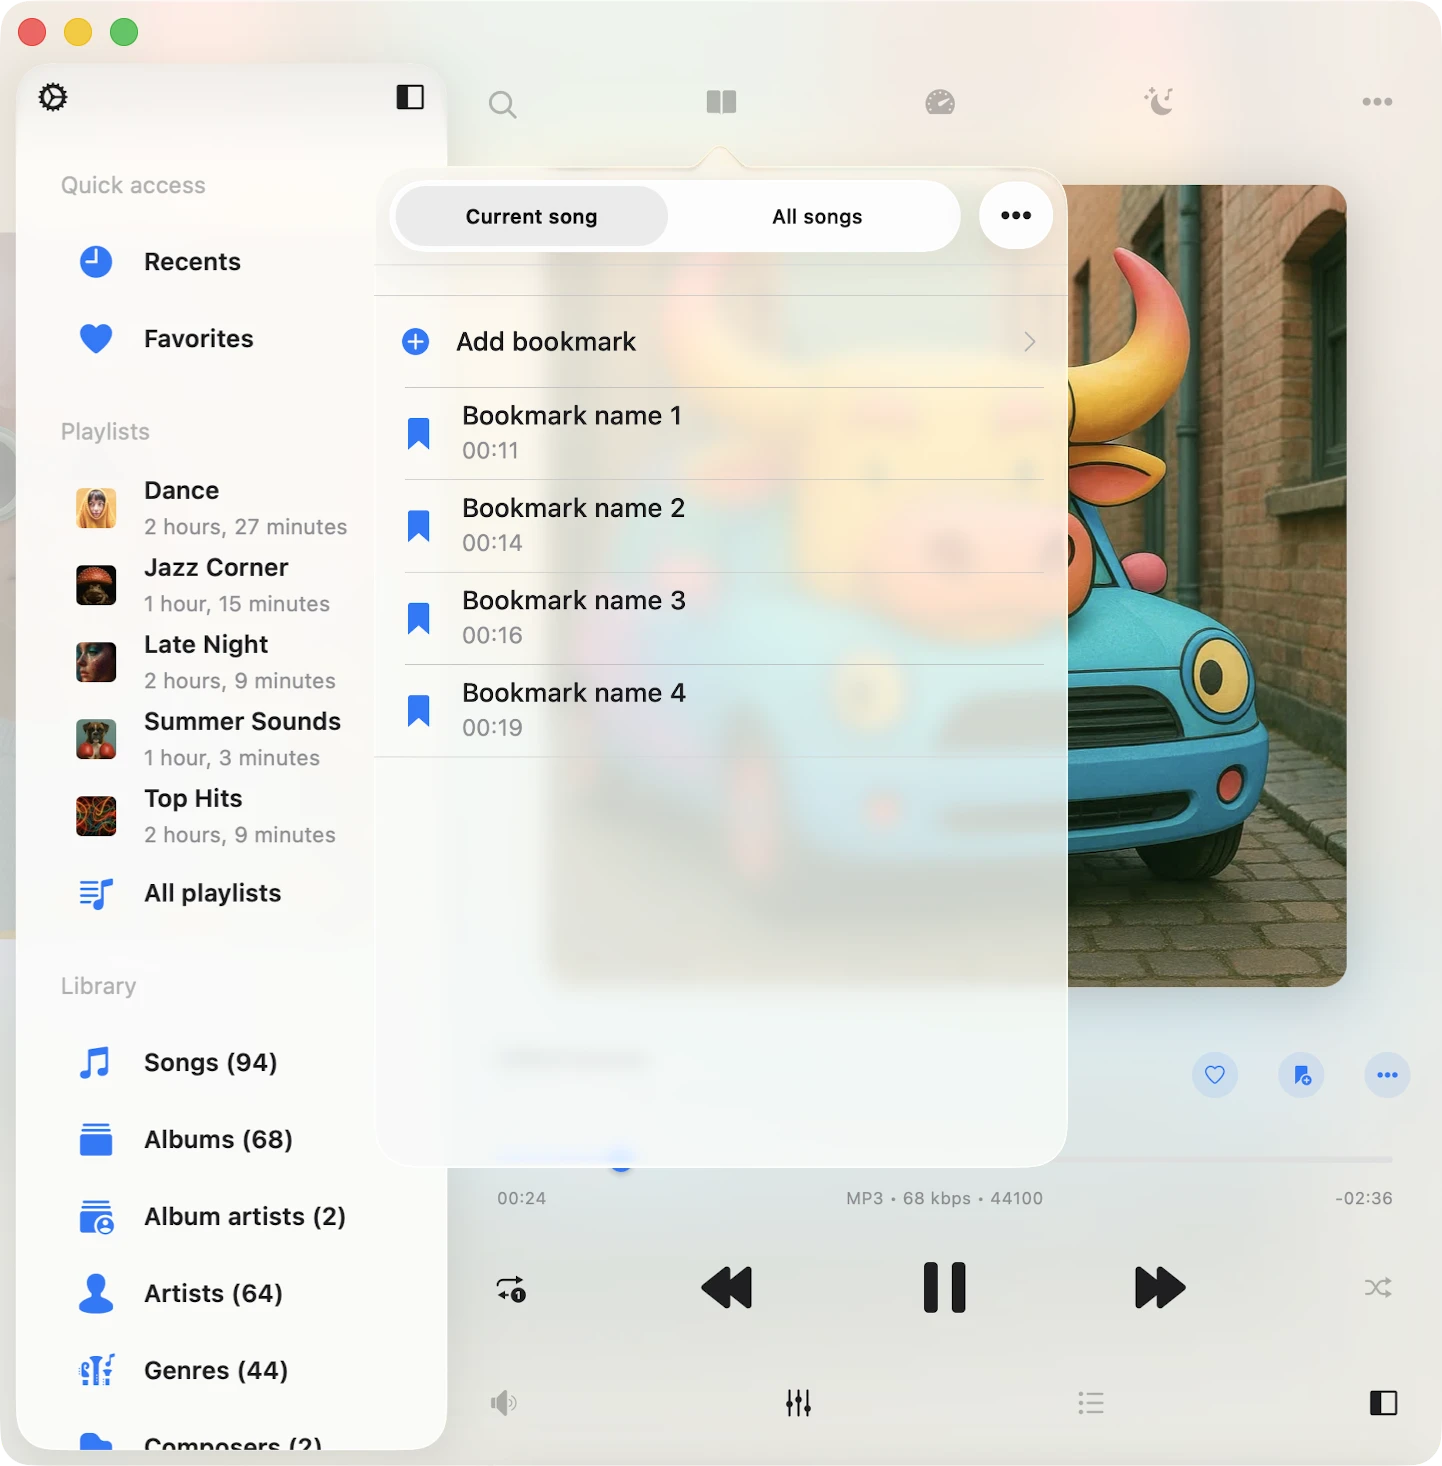
यहां आप अपनी music library के tracks के लिए multiple bookmarks create कर सकते हैं। Bookmarks use करने के बारे में हमारे पास complete instruction यहां है।
Player Queue
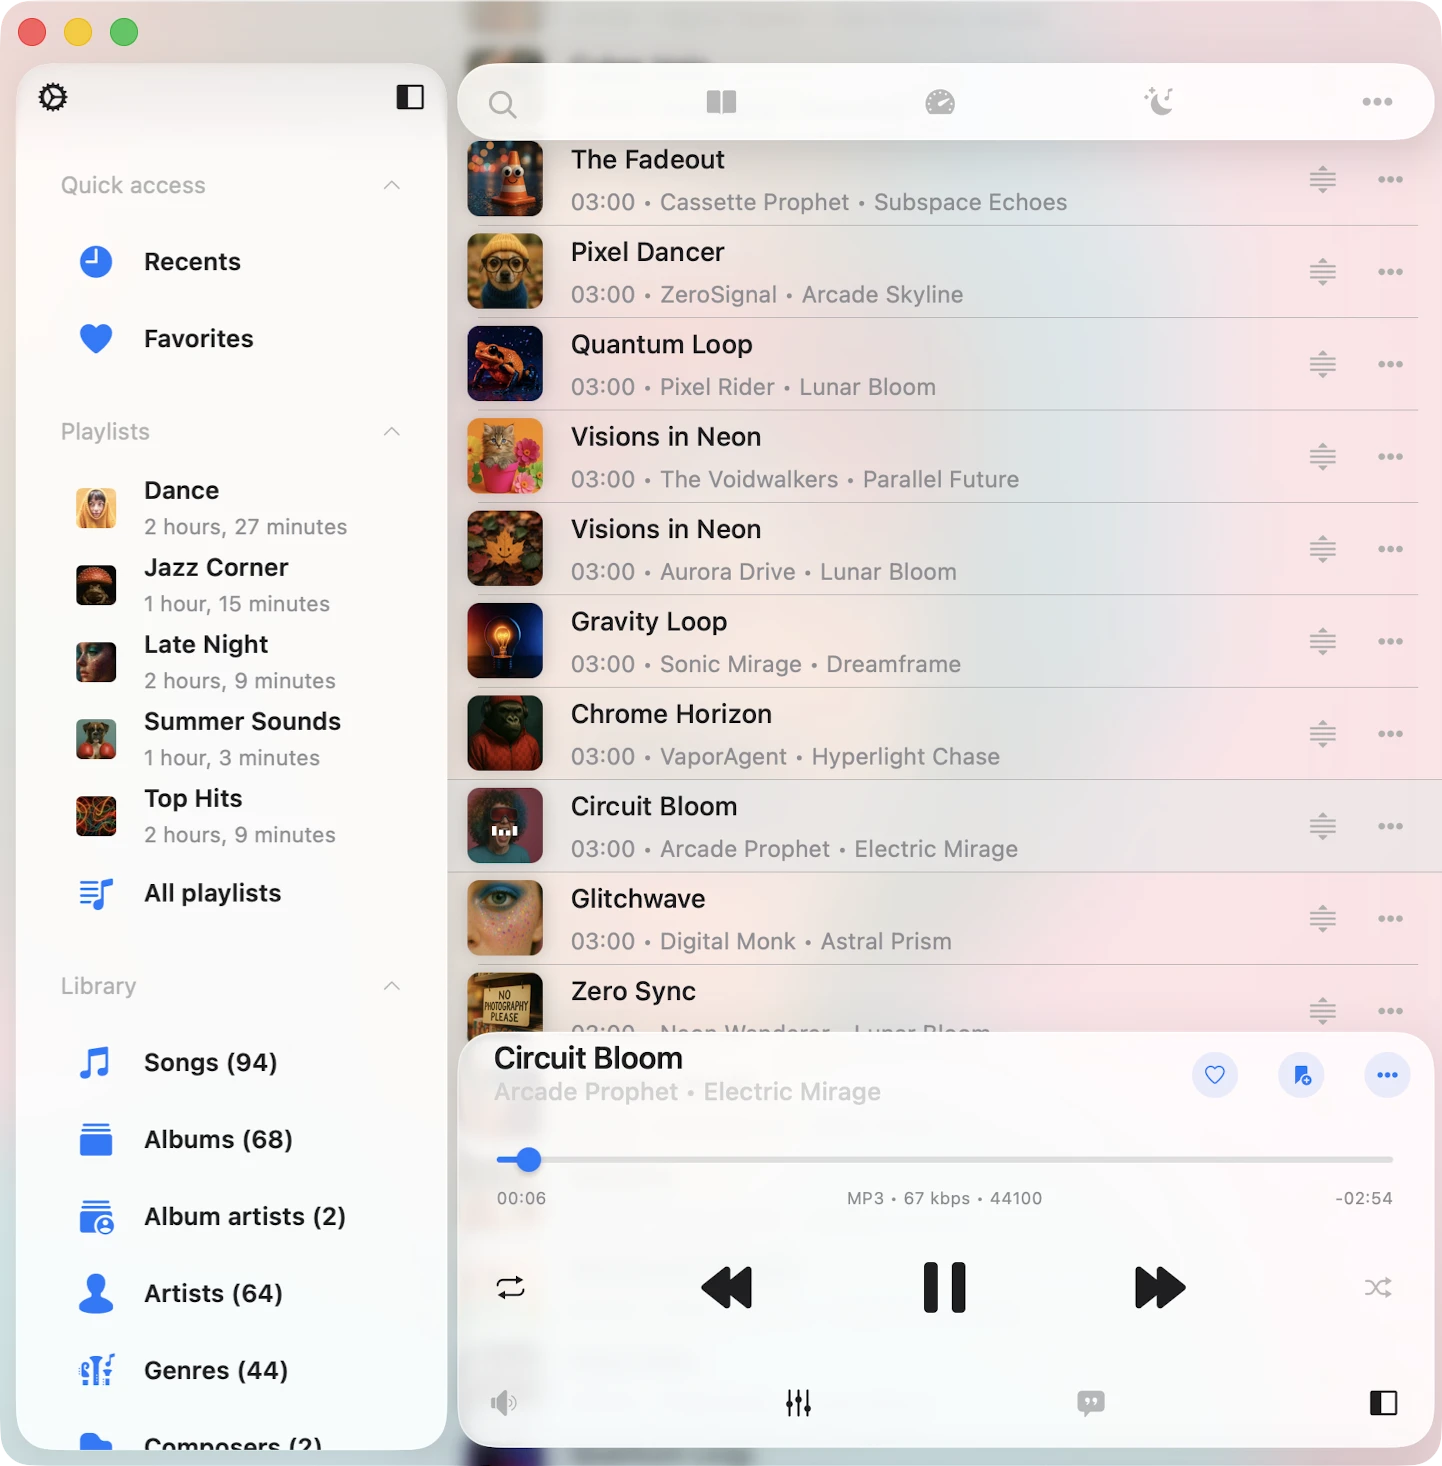
अपना player queue access करने के लिए, simply bottom toolbar पर located player queue button टैप करें। Queue में song move करने के लिए, title के पास reorder indicator use करें।
Comments / Lyrics
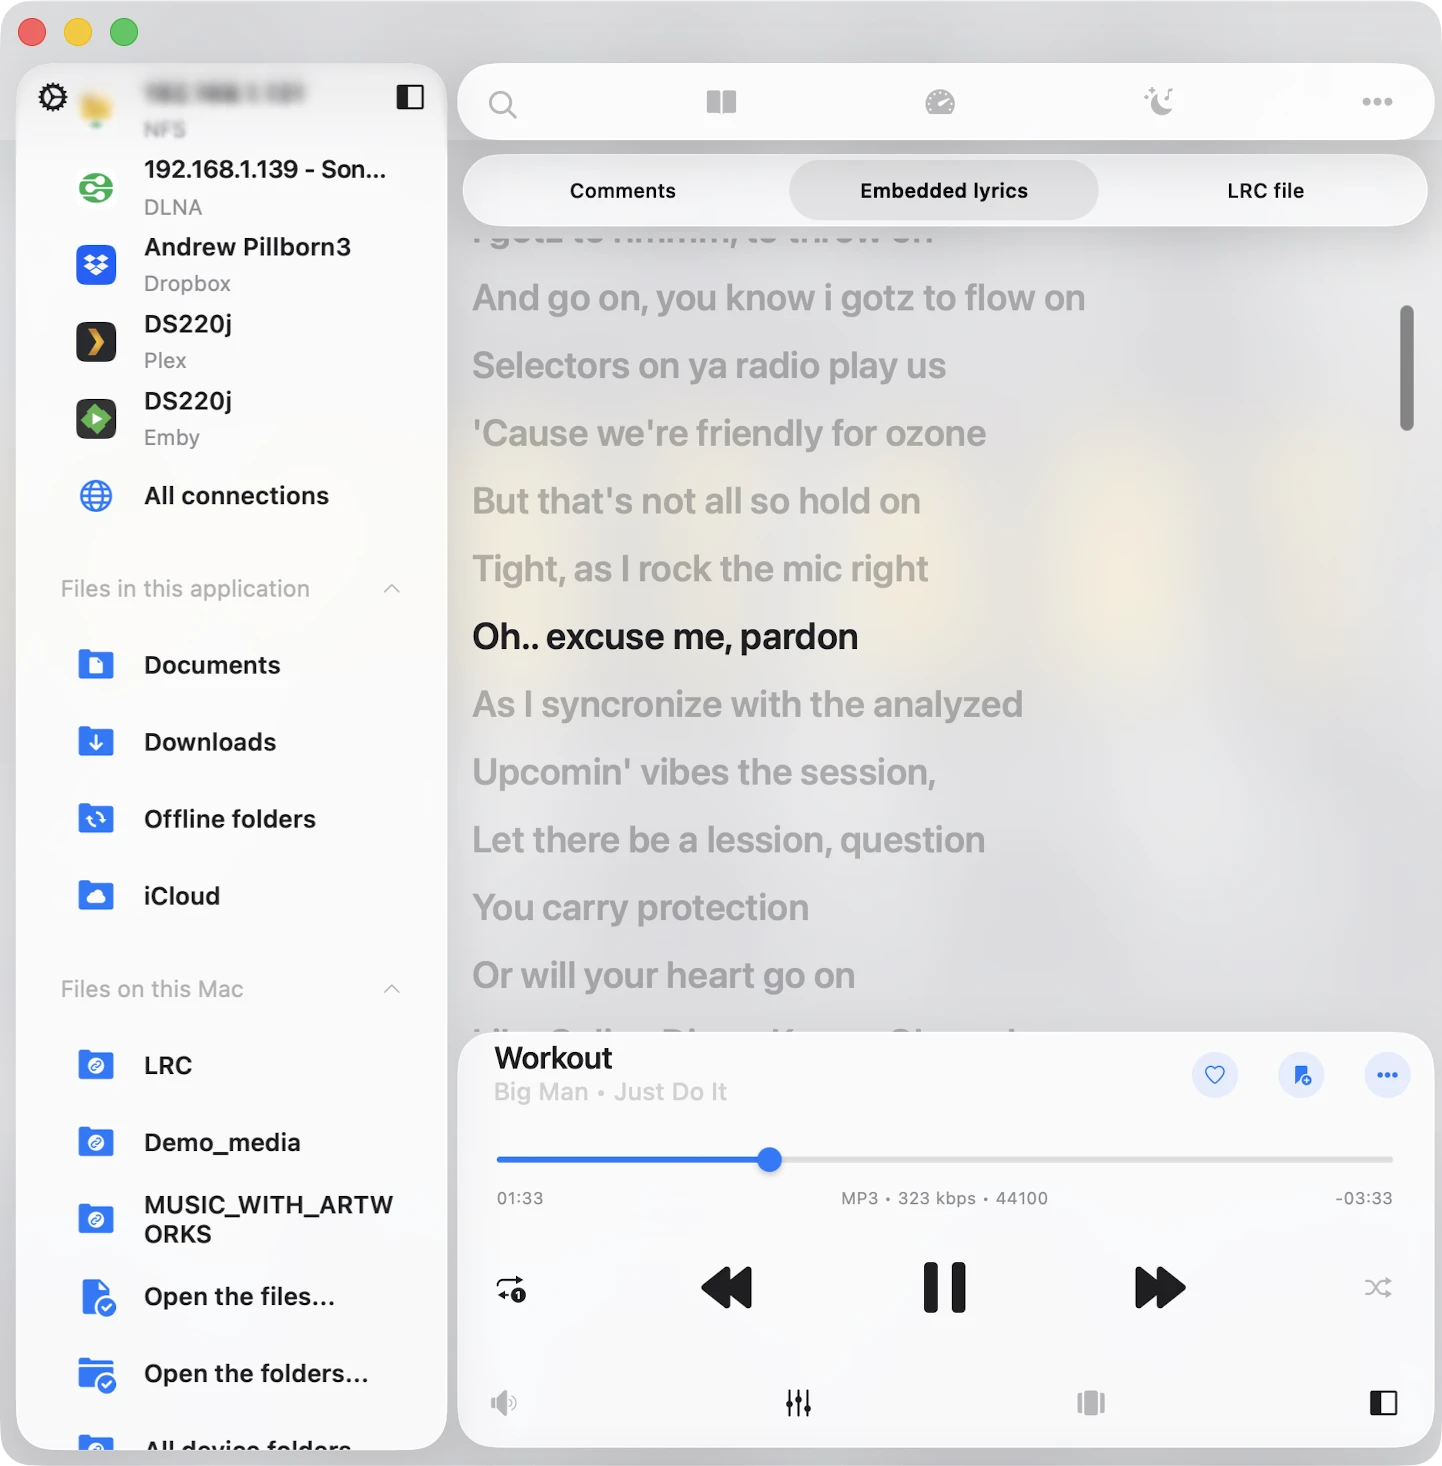
Track comments और embedded lyrics, साथ ही LRC files देखने के लिए, इन steps follow करें:
- सेटिंग्स खोलें।
- Audio Player पर जाएं।
- Personalization select करें।
- Buttons on the main screen टैप करें।
- Comments enable करें।
Lyrics view करने के बारे में हमारे पास complete instruction यहां है।
Options Menu
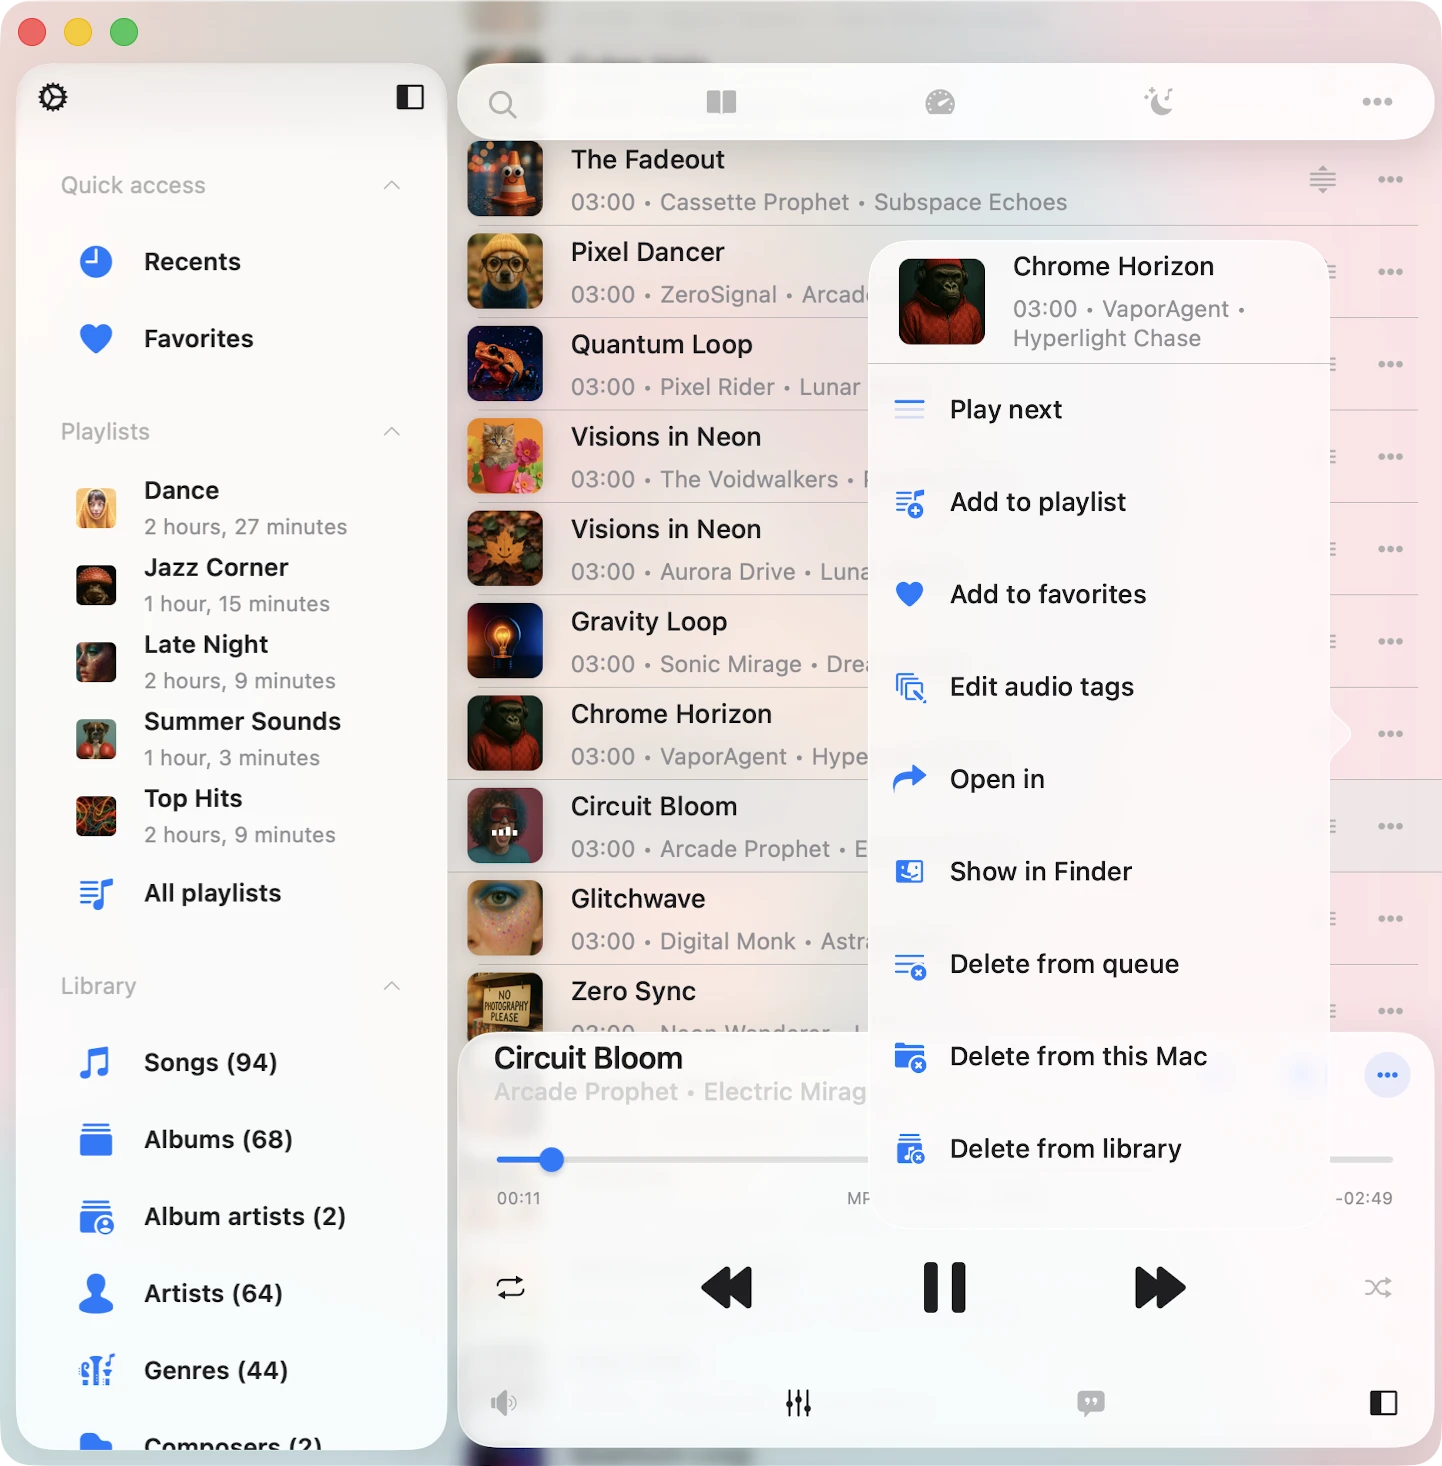
आपके audio player queue के हर song में एक more actions menu है, जिसे आप song title के पास three dots button टैप करके access कर सकते हैं। Available actions हैं:
- Play next: Song को player queue के top पर adds करता है।
- Playlist में जोड़ें: Song को playlist में adds करता है, new playlist create करने के option के साथ।
- पसंदीदा में जोड़ें: Quick access के लिए song को favorite के रूप में marks करता है।
- डाउनलोड करें: Song को local files में saves करता है, ‘Local Files’ tab और ‘Offline Music’ section में appearing करता है।
- ऑडियो टैग संपादित करें: Missing metadata fix करने के लिए built-in audio tags editor खोलता है, आपके storage पर song modifying करता है।
- Show in folder: जहां audio file stored है उस folder को reveals करता है।
- Show in Finder: आपके Mac से import की गई files के लिए, यह action आपके Mac पर audio file located folder को reveals करता है।
- Open in: Audio file को किसी दूसरे app में exports करता है।
- Delete from queue: Selected song को audio player queue से removes करता है।
- Delete from cloud service: Song को music library और cloud storage दोनों से deletes करता है (कृपया ध्यान दें कि यह action irreversible है)।
- Delete from local files: Song को music library और local storage दोनों से deletes करता है (कृपया ध्यान दें कि यह action irreversible है)।
- Delete from music library: Song को आपकी music library से deletes करता है, जबकि file storage में रखता है।
Additional Player Actions
Currently played song title के left side पर more actions button “…” टैप करें additional actions देखने के लिए।
- Continue Playback: Queue और media position सहित जहां छोड़ा था वहां से resume करें। यह audiobooks के लिए particularly useful है और app settings में activate किया जा सकता है।
- खोजें: अपने audio player queue में specific track quickly find करें।
- बुकमार्क्स: अपने created audio bookmarks की list view करें।
- टिप्पणियाँ: Track comments और embedded lyrics, साथ ही LRC files view करें।
- Speed: Playback speed को अपनी liking के अनुसार adjust करें।
- हाल के: Recently played songs की list access करें।
- पसंदीदा: अपने favorited songs का collection देखें।
- Audio Equalizer: Audio equalizer activate करें।
- Sleep Timer: Specified interval के बाद playback stop करने के लिए timer set करें। उन moments के लिए बढ़िया जब आप अपने tunes पर doze off करना चाहते हैं।
- Save Queue to Playlist: Current audio player queue को playlist में save करने देता है।
- Delete Queue: अपना player queue clear करें और playback halt करें।
- सेटिंग्स: Audio player settings access करें।
- Help: Assistance और guidance find करें।
Recents और Favorites

Player screen पर, आप More Actions button ‘…’ टैप करके और respective menu item select करके ‘हाल के’ और ‘पसंदीदा’ sections access कर सकते हैं। दोनों sections में, आप songs search कर सकते हैं, सभी tracks play कर सकते हैं, सभी tracks shuffle कर सकते हैं, list export कर सकते हैं, और list delete कर सकते हैं। Song lists export करने के बारे में हमारे पास detailed instructions यहां हैं।
Mini Player Window (Mac Exclusive)
Mac users के लिए, एक handy mini-player window है। इसे access करने के लिए, simply अपना cursor app window के bottom-right edge पर move करें और इसे smallest possible size पर resize करें। फिर, mini-player window activate करने के लिए collapse button (downward arrow के रूप में depicted) टैप करें। अगर आप इसे अन्य windows के ऊपर रखना चाहते हैं, तो अपने Mac के top menu bar पर जाएं, ‘Window,’ select करें, और ‘Show Window Always On Top’ choose करें। यह feature especially convenient है जब आप audio lectures सुन रहे हों और कोई interruption नहीं चाहते।
Keyboard Shortcuts (Mac Exclusive)
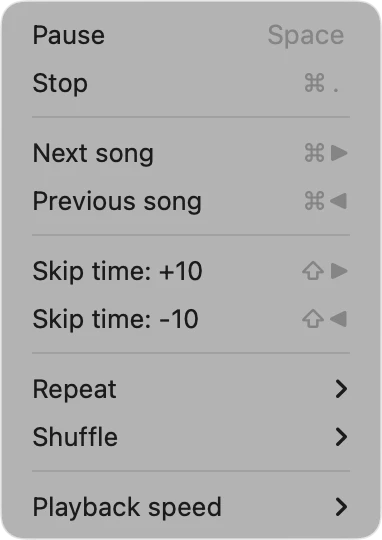
Mac users के लिए, status bar पर keyboard shortcuts के साथ एक system playback menu available है। उदाहरण के लिए, Play/Pause करने के लिए, बस अपने keyboard पर spacebar टैप करें। Stop, Next Song, Previous Song, Skip Time, Repeat, Shuffle, और Playback Speed के shortcuts screenshot में shown अनुसार available हैं।
Audio Player सेटिंग्स
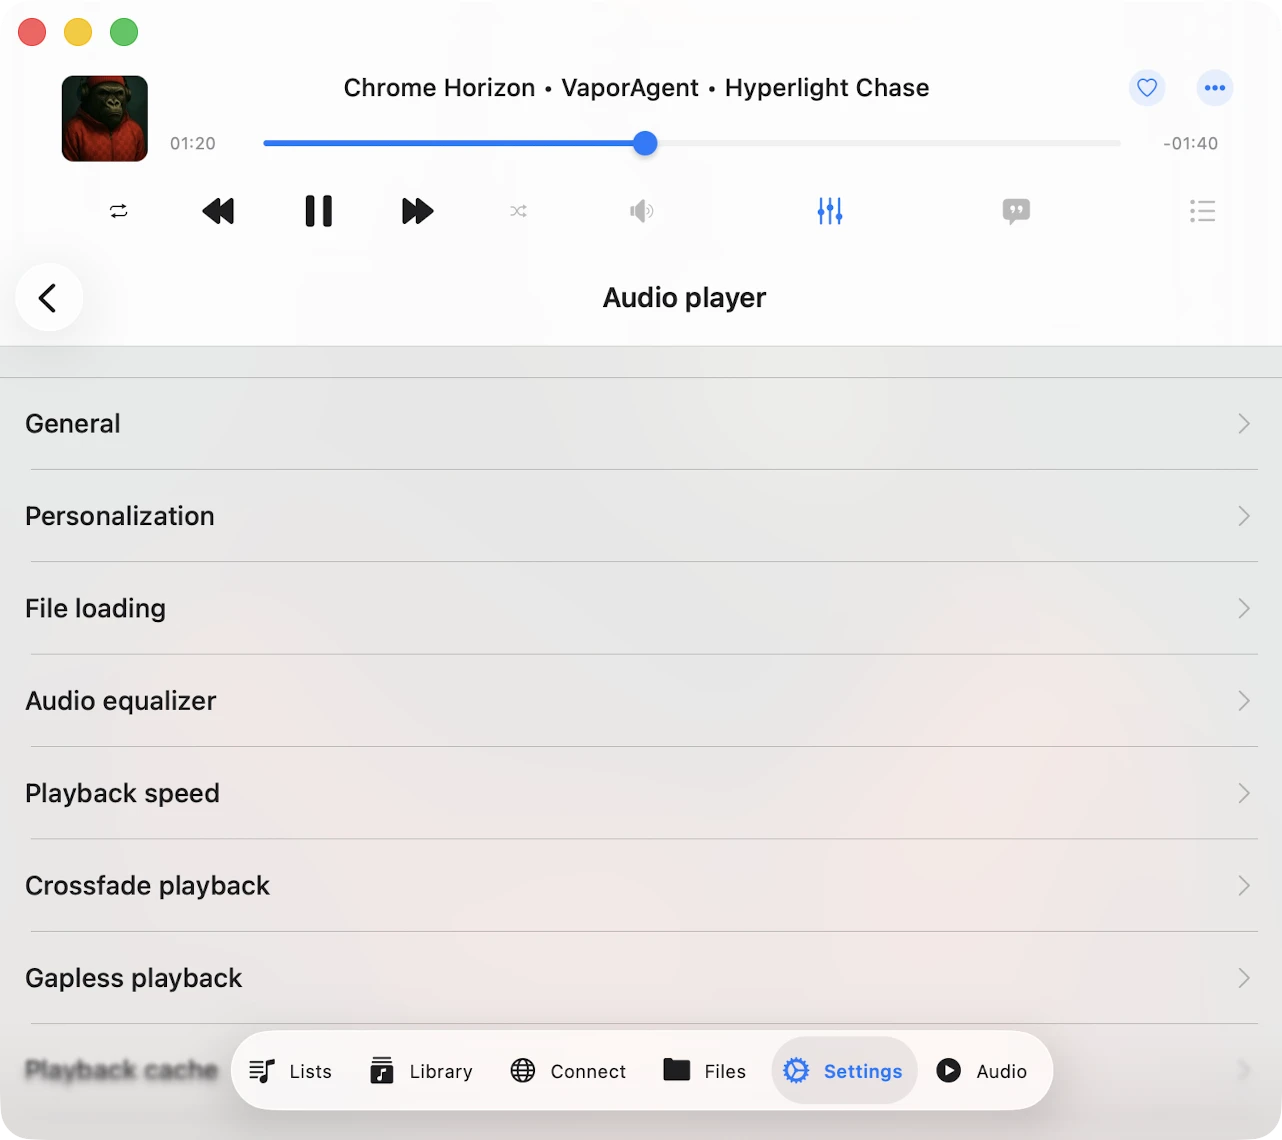
Audio player settings access करने के लिए, audio player screen पर More button टैप करें और drop-down menu से “सेटिंग्स” select करें। यहां, आपको functionality द्वारा grouped विभिन्न sections मिलेंगे:
सामान्य
Playback queue, audio output, और state-saving के लिए general audio player settings house करता है।
Available options:
-
Repeat mode: Audio player behaviour specify करने के लिए repeat mode change करें जब track playback finish हो। आपके पास कई options हैं:
- “Repeat All” – आपके player queue के सभी tracks looping के लिए।
- “Repeat One” – केवल current track repeating के लिए।
- “Repeat Stop” – current track ends होने पर playback pause करने के लिए।
- “Repeat None” – बिना repeat किए अपने queue को play through करने देने के लिए।
-
Shuffle mode: Tracks order randomly change करें। यह action queue में tracks order change करता है और tracks new order के साथ one by one play होते हैं। Available values: “Shuffle off”, “Shuffle on”.
-
Audio processor: Possible values: AVFoundation और CoreAudio। Default रूप से, AVFoundation audio processor use होता है। हालांकि, iOS versions 17.0 से 17.6 में AVFoundation audio processor के साथ एक known issue के कारण, crossfade playback feature और audio equalizer simultaneously use नहीं किए जा सकते। iOS 17.0-17.6 पर दोनों crossfade playback और audio equalizer enjoy करने के लिए, CoreAudio audio processor पर switch करें।
-
Audio output sample rate: यह आपको 8KHz से 384KHz तक audio output sample rate set करने देता है। यह feature available है अगर CoreAudio audio processor selected है।
-
Audio output number of channels: यह आपको audio output number of channels set करने देता है। Possible values MONO और STEREO हैं। यह feature available है अगर CoreAudio audio processor selected है।
-
Audio pitch algorithm: यह आपको audio pitch algorithm set करने देता है जो pitch correction के लिए apply होगा। Available values हैं ‘Time Domain,’ ‘Spectral,’ और ‘Varispeed.’ Useful अगर आपको playback speed increase करनी है।
-
Spatial audio: Spatial audio एक more immersive audio experience create करने के लिए psychoacoustic methods use करता है। Possible values हैं: Deactivated, Mono and Stereo, Multichannel, Mono Stereo Multichannel।
-
Audio output mode: (iOS only पर available) audio output mixed mode set करने देता है ताकि इस application का audio अन्य applications के साथ blend करे। [Instructions available here].
-
Save playback position: Application को आपकी music library के songs के लिए playback position save और restore करना ensure करता है।
-
Save audio player state: Application close करने से पहले आपकी audio player state save करता है।
एक बार जब आपने ये दोनों features enable कर लिए, Evermusic के भीतर कोई भी folder, album, artist, या genre खोलें। आपको screen के top पर एक ‘Continue Playback’ button दिखेगा। Resume करने के लिए टैप करें।
Personalization
Audio player screen का look customize करने और skip time controls configure करने की अनुमति देता है।
- Audio Player Screen Style: Audio player के main screen पर components position choose करें।
- Album Covers Scrolling Style: Preferred album covers scrolling style select करें।
- Additional Elements: Screen पर display करने के लिए ‘Audio Format Info’ और ‘Audio Volume Slider’ enable करें।
- Main Screen Actions: Repeat, Shuffle, Sleep Timer, Chromecast, AirPlay, Bookmarks, Speed, Lyrics आदि जैसे visible buttons choose करें।
- Playback Controls on the Lock Screen: Lock screen पर Skip Time, Add Bookmark, Add to Favorites और अन्य controls enable करें।
- Skip Time Buttons: Skip buttons के लिए time interval select करें।
File Loading
- Network type: Wi-Fi या Wi-Fi और Cellular data के बीच choose करें।
- Preloading time: Buffering interval set करें।
- Use direct URL: Supported होने पर direct streaming enable करें।
- Optimize song loading: AVFoundation audio processor के लिए stability improve करें।
Audio Equalizer
Audio equalizer के लिए configuration और presets change करें। आप अधिक यहां पढ़ सकते हैं।
Playback Speed
यह आपको audio player playback speed adjust करने देता है। अगर आपको अधिक precise adjustments की आवश्यकता है, तो top right corner में configuration icon टैप करके precise slider activate करें।
Crossfade playback
Crossfade songs को एक continuous mix में seamlessly flow करने देता है। Next song current one finish होने से कुछ seconds पहले play शुरू होता है। कृपया ध्यान दें कि crossfade AirPlay और Google Chromecast के लिए available नहीं है। इस screen पर, आप वह duration select कर सकते हैं जब current song और next song simultaneously playing हों। अगर आप crossfade playback और audio equalizer simultaneously के साथ issues experience करते हैं, तो ऊपर described अनुसार audio processor change consider करें।
Gapless playback
Gapless playback ensure करता है कि songs बिना किसी interruptions या silence के play करें। यह classical music, live recordings, और concept albums जैसे genres के लिए perfect है। अगर आपको gapless playback के साथ issues हैं, तो ऊपर described अनुसार audio processor change consider करें।
Playback Cache
Audio player queue के songs smooth playback के लिए automatically download होंगे। अगर आप audio files manually download करते हैं, तो duplicates avoid करने के लिए आप यह option disable कर सकते हैं। आप यहां audio player cache size भी configure कर सकते हैं।
Sleep Timer
Specified timeout के बाद playback stop करने के लिए timer enable करने देता है। अगर आपको अधिक precise adjustments की आवश्यकता है, तो top right corner में configuration icon टैप करके precise mode activate करें।
Accessibility
हमारा app VoiceOver technology के साथ fully accessible है, हर component में well-designed label और description ensure करते हुए। VoiceOver active होने पर, app user interface को text mode में translate करती है, navigation speed और convenience improve करने के लिए केवल accessible और useful elements display करती है। आप सेटिंग्स > Accessibility > Text Mode में text mode भी activate कर सकते हैं।
VoiceOver के साथ sliders adjust करने के लिए:
- Slider Select करें: VoiceOver तक slider announce होने तक left या right swipe करें।
- Value Adjust करें: Slider पर double-tap करें और hold करें, फिर value अधिक quickly adjust करने के लिए up या down drag करें। जैसे आप adjust करते हैं VoiceOver नया value announce करेगा।
VoiceOver के साथ list में track position adjust करने के लिए
- Track title के पास reorder indicator icon टैप करें उसे focus देने के लिए।
- Reorder indicator icon quickly double-tap करें। Second tap पर, अपनी finger release न करें — hold करें जब तक आप एक sound न सुनें जो indicate करे कि cell move के लिए ready है।
- अब, आप cell को new position पर move कर सकते हैं।
अन्य components expected रूप से काम करते हैं, system-provided VoiceOver patterns का उपयोग करते हुए।